Monday, November 28, 2011

How to make the Red Angry Bird

Hi there. ( Note to self : Is there anyone reading this blog at all? )

I am often asked how I make my angry birds.
So here is the first installment of the series of tutorials on how I do every one of them.

Let's start making the STAR of them all.
My favorite....the Red Angry Bird.


Get your fondant and tools ready.

Here are the colors you will need :


Roll your red fondant into 2 balls ( a big one for the body and a small one for the feathers which we will be putting on top of the bird's head )


Divide the small ball into 2 pieces and roll each piece into a tear drop shape.


Dab a small amount of water on one and put on top of the other.


Roll a small piece of white fondant.


And flatten ( I used the back of my cake scraper ) or better and easier to cut a circle from a rolled fondant using a round cutter.


Use the water to glue it on the bottom of the red fondant body.


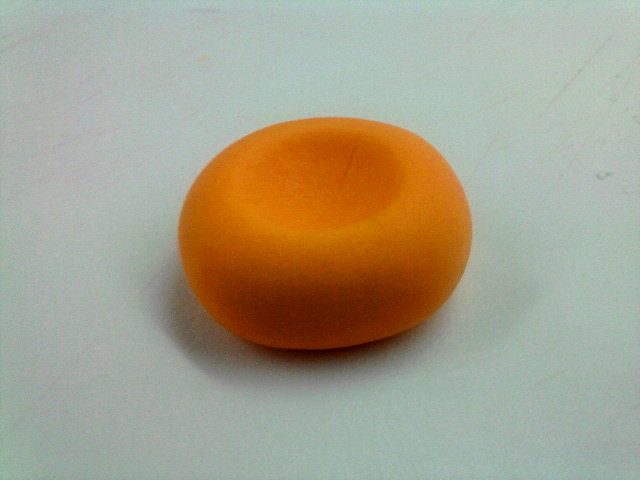
To make the beak, roll orange fondant to a tear drop shape and gently pinch to form a triangle beak.


Indent a line into the beak.


Here's a better picture.=)


Glue beak in the middle.


 Make two small balls for the eyes and flatten.


Place on top of the beak.


You'll need to make dot size balls of black fondant to serve as the birds eyeballs.


Place in the middle of the eyes.


Make two small tear drop shaped black fondant for its eyebrows.


Position on top of the eyes.


For the feather on its back, shape black fondant like so and indent 3 small lines.


Poke a small hole on its back


And insert the feather there.


Lastly, place the red fondant feather on top of its head.


Tada!....now we're ready to place it on our cake and cupcakes.


Next....the Yellow Angry Birds.=)

Enjoy!

Sunday, November 20, 2011

How to make pumpkin cake/cupcake topper tutorial

Hi there.

Reposting this tutorial.
I accidentally deleted this post while navigating around my blog. =(

This was my first tutorial so I had to post this again.

See the cute little pumpkins?


Sorry, these are much better.


Here is how I made them.

Let's start.

You will need the following fondant colors :


and these tools


I just use water to glue the pieces together.  Have a small cup of water and a brush on your side.

Roll a piece of your orange fondant to a ball and press the middle with the ball shaped end of your modeling tool.


With the pointed tip of your flat modeling tool, score lines very carefully starting from the center top all the way to the bottom center of the ball.  Indent as many ridges around but make sure each line are evenly spaced.


Take a small green fondant, roll into a ball, flatten and shape into an uneven square.
Glue on top.....you can try to make the edges of your square a little pointed to make it look better.=)


Poke a small hole in the center using a toothpick.  It should be large enough for the bottom of your stem to fit into.


Roll a small piece of brown fondant into a tear drop shape.

Insert into the hole and you're done.=)

I just made cut marks to the stems to achieve the "stem-like" look.


 Now they are ready to be placed on top of your cake.


 And cupcakes too....


Enjoy!


Thursday, November 17, 2011

How to make the Pigs from the Angry Birds game

Hello.

Life at work has been a roller coaster ride these past few weeks.
I have'nt found the time to blog.
It's been a while since my last post.
Glad to be posting again.=)

Been doing a lot of Angry Birds theme cake lately.
Yes, the war between them and their arch-nemesis, the Pigs, has spread to the cake world.


I'm supposed to share how I make my Angry birds but decided on sharing how I  make their rival pigs first.
We will be making 2 pigs, the "regular" pig and the one with the mustache too.=)

Sorry about the quality of my pictures though.

Lets start.

Again, do not forget to have water and your brush on the side to glue the pieces together.

You will need these fondant colors.


Roll just the right amount of green fondant ( depends on how big you want your pigs to be ) to an oblong shape.


Get a small piece of fondant ( for the nose ) and roll into an oblong shape as well.


Flatten.


Glue together.


Making the mustache :

Cut a small piece of orange fondant and roll like so.


Flatten.


Cut small vertical lines ( about 4 or 5 lines ).


Glue just under the nose.


Making the eyes :

Roll 2 small white fondant to a ball.


Flatten.


Glue to both side just above the nose.

your mustached pig


Roll a smaller ( dot size ) black fondant to serve as the eyeball.  Or you can use an edible black marker if you wish ( its a lot easier I think...)


Glue like so...
You can actually place it on the left or right side to make it look like it's looking at something from there.


Or try placing the eyeballs on top or bottom like it's looking up or down.=)


Placing the nostrils :

Roll small pieces of black fondant.


Mark the spot where you want to place the nostrils.


And attach it there...


The ears :

Shape green fondant like so...


Roll black fondant into 2 tiny balls.


Glue it in the middle of the ears and press lightly to flatten it onto the ears.


Back to the pig, poke two small holes on top of its head where the ears are to be inserted.


There you have it.....the green pigs!


They're ready to be toppled by the Angry Birds ( now you know which side I'm on )....


Looking ready to steal the birds unhatched egg....


Hope I was of help.

Up next, the Red Angry Bird tutorial.

Enjoy!


LinkWithin

Related Posts Plugin for WordPress, Blogger...